Mashtun and Meow: Sheffield Beer Blog: homemade
Showing posts with label homemade. Show all posts

Monday 13 November 2017

Pecan Pie

It is approaching that time of year, in the preamble to Christmas, when our overgrown colony across the pond celebrates Thanksgiving. It is a time that seems as an ungrateful outsider an excuse to eat food and drink, but I am sure there is more to it than that. Still, never really in need of an excuse anyway to fill myself with copious amounts of pudding, here we go...

One of the traditional things that is consumed for Thanksgiving is the Pecan Pie, a shortcrust pie base with a caramel style nut filling. We made a version to take to a potluck dinner and it went down sufficiently well to warrant sharing the recipe!


Ingredients:

500g pack sweet shortcrust pastry
75g butter
150g golden caster sugar
300g golden syrup
1 tsp salt
3 eggs, beaten
½ tsp vanilla extract
300g pecan halves
Splash of rum (optional)

Method:

To start, line a pie dish with shortcrust pastry - either a home-made pie crust if you really want to make one, or a ready roll packeted one (which is what I use, if it's good enough for Nigella etc etc) will work. It needs blind baking for the first 15 minutes, then 5 minutes to colour. So, begin by covering the pastry with a layer of baking paper or tin foil, and add baking beans (whether ceramic or dried chickpeas it matters not). Pop in a preheated 180°C oven for 20 minutes, and then remove the beans for a final 5 minutes.

During this time you can begin work on the filling. For this I use golden caster sugar, golden syrup, unsalted butter and a teaspoon of salt - although optional, the savoury edge that comes from the salt lifts the pudding no end. Heat the ingredients together slowly in a large heavy bottomed pan. As the butter starts to melt keep stirring the mixture, so that it doesn't burn. As the mixture starts to boil it will rise up the pan... keep stirring and allow to boil for a minute or so, then turn the heat off and leave to cool slightly. While you are waiting for it cool, mix together the eggs, vanilla extract, and pecans (keeping some aside to adorn the top prior to baking) and the rum, if using. I like to use a demerara rum that adds a lovely alcoholic sweetness to the pie, but any rum will work.

When you have all three elements ready, pour the still warm caramel into the eggs, stirring continuously to avoid curdling. At this point a waft of delightfully warm rumminess will fill the kitchen if you've chosen to take the boozy path. When everything is combined, pour the heady, sticky-sweet filling into the pastry case. Decorate the top with some pecans (these will toast lightly during the cooking time) and return to the oven for 35-40 minutes, until the pie has set. Leave to cool and the whole lot will further solidify. You can eat the pie straight away, or if you are so inclined store it in an airtight tin and eat within a couple of days. The pie should serve about twelve, with a helping of cream or dollop of ice cream.


Enjoy!

Jim

Monday 27 October 2014

The Milestone Cookery School

The Milestone, for those who don't know, is one of Sheffield's greatest restaurants, serving high end food made from locally sourced seasonal produce, with a sincere passion (verging towards reverence) shown towards the ingredients. They run a variety of regular masterclasses, from day courses in pastry or pasta, to "A Pig in a Day", and half day courses in bread, Indian street food and the course I went on, all about sausage, bacon and black pudding. The cookery school experiences can be given as gifts in the form of vouchers bought from the restaurant or online here and this is how I found myself counting down the days to the visit.

When the day finally dawned, I arrived a little nervously clutching my golden ticket, to be greeted with a coffee and some pastries in the dining room downstairs, which is cosy and inviting for all occasions. After the full group of seven arrived, we made our way upstairs to what is usually another space for eating, which had been converted for the occasion into an makeshift cooking space with a single gas stove ring and a big knife each.


The Cooking

We started the proceedings by preparing the black pudding. This began its life as a tray of powdered blood and half a bottle of cider, to which we added lightly fried onions and some nutmeg, before passing it to Richard (our host for the day) to put in the kitchen's oven.

We moved on to the delectable bacon cure: a simple blend of equal parts sea salt and brown sugar, with the aromatic mixture of nutmeg and thyme to add a varied sweetness and a herby meatiness. Richard prepared the full pork belly joint for us, demonstrating an array of butchery techniques, leaving the short rib behind to provide us each with a tender fatty portion of meat ready to be cured.

As we placed the bacon to one side, word came from the kitchen that the black puddings were done, and they were brought forth, still in the steaming bain marie. As we were presented with the warm blood pudding, the next event was prepped. An exercise in plating up food, using the Milestone's very own burnt onion sauce, horseradish crackling and divine miniature apple jellies. I can't quite believe I managed to produce such a pretty plate of food!

The final activity was sausage making, an awkward skill for the clumsy set of hands I came with, but in the end a very worthwhile technique to know. We started by mixing to ground pork, a small amount of lightly fried onion with a great selection of fresh herbs, such as thyme and parsley as well as an ingredient that I had only heard in hushed whispers around whisky tastings... Smoke powder. This definitely lived up to my dreams - a seemingly magical white powder that filled the whole room with a smell of open fire. Once all the ingredients had been mixed and squeezed to the bottom of a piping bag we were ready for rolling.

The skin of these sausage was to be crepinette (known less exotically as caul fat). Rather than using the lower intestine, this French method of wrapping meat in bladder lining quickly became obvious as an easier method, than the filling of traditional sausage. Once piped as a strip onto the crepinette, all that was needed was a tight roll once and the outer would stick to itself. Once we had our sausages portioned, we cooked a few up and were presented with a hearty dollop of the restaurant's mash and their frankly delicious gravy.

Being able to leave with a bacon on the cure, a still warm black pudding and a fistful of sausages just meant I was hankering to cook it all.


The Eating 

What better way to eat a smashing homemade sausage than with Yorkshire puddings, roasted sweet potatoes, and lashings of tarragon gravy. The perfect Sunday tea.


Chicken, bacon and black pudding empanadas, and black pudding huevos rancheros.


The traditional English breakfast, remastered with a healthy dose of homemade bacon, some free range eggs and a pinch of chilli.


I'll definitely be making the bacon again, and would feel confident with the sausages and black pudding too once I'd paid a visit to a good butcher to acquire the right ingredients. All in all, the experience was a great day which taught me an array of new skills. Highly recommended.

Cheers,

Jim

Monday 21 July 2014

A taste of Japan

We both happened to have a day off today, and weren't quite sure what to do with it. We then discovered that today is Sea Day, a national holiday in Japan to give thanks to the ocean - and so what better occasion than to use that sushi kit we got for Christmas!

We used two cups of sushi rice to two cups of water, which was massively overcatering for two people - this would have fed four for lunch or 6-8 as a starter. Carefully rinsing the rice before cooking is really important, as is leaving the rice to steam with the heat turned off for at least ten minutes after 10-15 minutes cooking over a low flame.

We chose to use Earl Grey smoked sea trout for the fish option, and bought ourselves a great piece of rump steak from the lovely folks at Mr Pickles, which was seared for 7 seconds on each side before being left to cool in the freezer for one hour, which allowed it to be sliced perfectly thinly. We went for cucumber, red pepper, courgette and spring onions too, which were all carefully cut to a uniform size.

We made maki (traditional rolls where the filling and rice is wrapped in seaweed) in veggie, fish and meat options, as well as temaki (the cone-shaped pieces), nigiri (sliced meat or fish on a bed of seasoned rice) and California rolls (where the rice forms the outside of the sushi).

As total novices who had never made sushi before, and having read a number of instructions implying it's pretty tricky, we did not have high hopes for how our little rolls would turn out. Imagine our surprise when they looked more than passable!
Garnishes and seasoning were wasabi paste, a dressing made from soy and garlic sriracha hot sauce, and home-pickled ginger.

Alongside a dram of Nikka from the Barrel, I feel we successfully paid homage to a little slice of Japanese culture.
Kanpai!

J&L

Wednesday 28 May 2014

Harissa

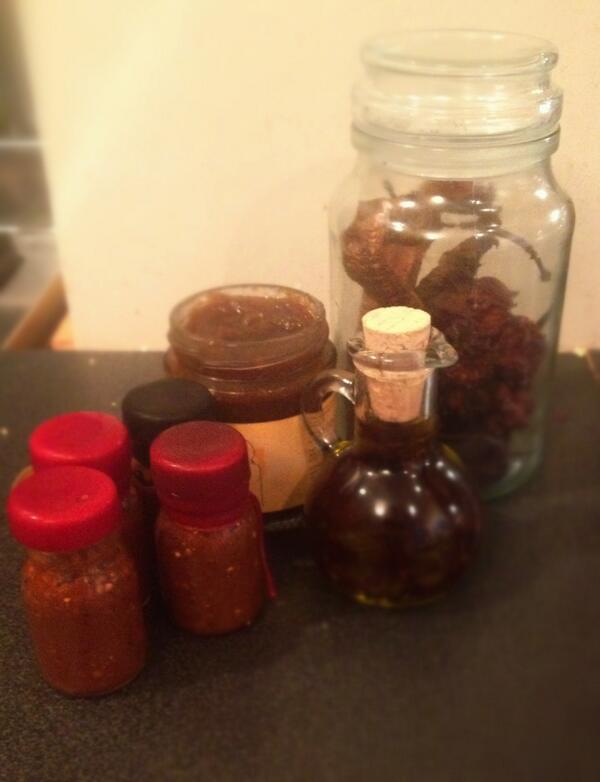
Recently, you may have seen I have started drying and smoking my own chillies. This is a great way of getting a longer shelf life out of an abundance of chillies whilst simultaneously adding flavour and holding in the spice. This has resulted in our kitchen being filled with a multitude of dried crispy nuggets of heat.

I decided to use these chunks of hotstuff to make some homemade sauces. A touch of tangy, spicy Harissa is perfect for so many dishes and really livens everything up - whether cooked out for a tagine, used as a marinade on a pork chop or a piece of steak, or simply added to couscous as part of a salad with a splash of oil and vinegar, it is an extremely versatile sauce.
Delicious fresh Scotch Bonnets

I made two different varieties: one that is hot yet sweet, and another which is hot yet hotter.

Sweet Hot Harissa
2 red peppers
1 fresh Scotch bonnet
2 dried Scotch bonnets
2 cloves garlic
1 teaspoon coriander seed
1 teaspoon black pepper
1 teaspoon cumin seed
Lemon juice
Olive oil

Hot Hottest Harissa
5 fresh Scotch bonnets
3 dried Scotch bonnets
3 cloves garlic
1 teaspoon coriander seed
1 teaspoon black pepper
1 teaspoon cumin seed
Salt
Lemon juice
Olive oil

Recipe
The method for both sauces is the same, with the only difference being leaving out the red peppers and adding more Scotch bonnets to make the hotter variety.

Clockwise: Roasting, Steaming, Peeling, Chopping
To start the sweet Harissa, the red peppers need to be prepared. Over a gas flame, chargrill the outer skin of the peppers until blackened and softened. Place the peppers in a polythene bag for a couple of minutes, and they will steam slightly, which will allow the skin to be removed more easily. The peppers will now have become sweet and tender: chop them roughly and place them into a blender. Simply miss out this stage if you want to make the searingly hot version.

Now focus on the chillies. Soak the dried chillies in a little boiling water to soften them a little. Remove the stalk from the fresh Scotch bonnets and then boil in water for 2/3 minutes... this will take a slight bitterness off the chillies. Remove them from the water and add to the blender, along with the garlic. If you want to soften the heat then remove the seeds from the chilli before blanching (you might want to wear plastic gloves). Then blend with the strained dried chillies (keep the water behind for later).

The finished product with a gratuitous chilli oil.
Toast off the whole spices until you get a small smoke off them, then add the spices to the blended chillies. Add the juice of a lemon to mix with a pinch of salt if needed. If the mix looks a little thick, add some of the water used to soak the dried chillies and a splash of olive oil.

The sauce will keep for two weeks in a sterilised container in the fridge, and will last even longer if you take care to keep a layer of oil covering the sauce, preventing any air getting into the spiced joy below.


Enjoy,

Jim.